

The first plan was to bake a cake in the shape of the building itself so I started collecting pictures to build a 3D model of the cake and plan this way the baking. The building itself isn’t really articulated but it has different parts at various roof heights plus a nice fancy-shaped dome above where the actual concert hall is located in it.

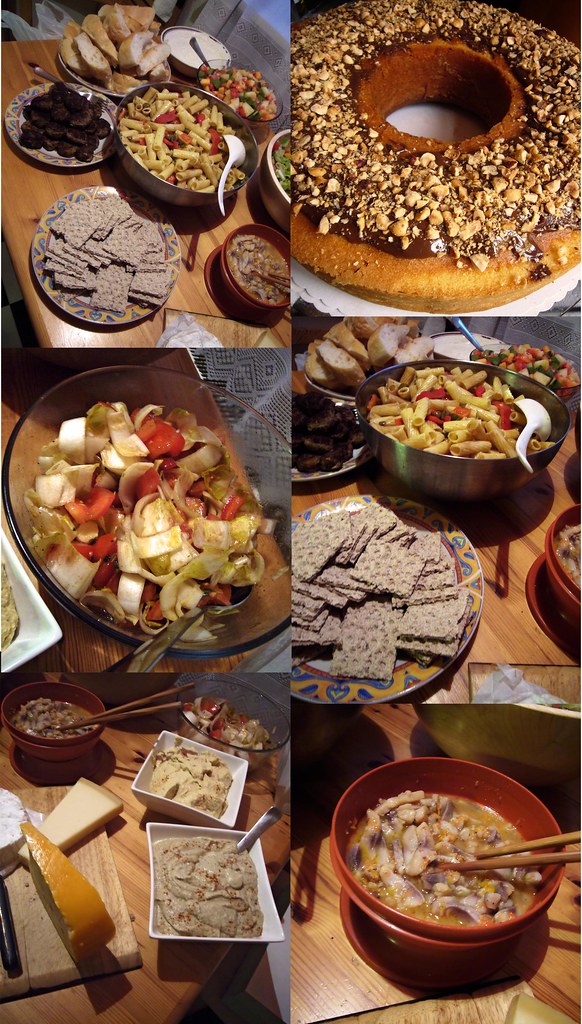
The days went by between simmering chili con carne, lusciously buttery pound cake scented with Chinese rice wine, fresh and velvety hummus and baba ganoush, spicy and sweet Indian kebabs, one pasta and two vegetable salads (both prepared on the venue).
Monday it was holiday and few Canadian friends of a dear friend of mine were visiting Bonn so I took the chance to relax and unwind a bit.
It was a gorgeous day; sunny sky, light breeze, quietness around. A coffee was followed by a short walk and a light lunch then it was siesta time; we decided to meet up again for dinner and a lovely booze-till-you-ooze night. The day went by smoothly and the cocktails were to die for as usual. Bottom line, I didn’t have much time to think at the Beethoven cake; still a few ideas crossed my mind.
With just less than one week to go, I had to come up with a proper plan and realize it. Who knows me would also know that I am not so easily pleased by my creations and always reach for new and unknown places; and this create stress as well as lots of good adrenaline.
The event organizers told me that also 150 petits-fours would be as acceptable instead of the cake; so I decided to go for them. And what about Beethoven? Not much place on a mini-muffin to place him (though now I have got an idea) so he had to go on a nice centerpiece.
The adventure begins. How should it look like? Why should it look like that? It was time to turn again to the internet. Outside the Beethovenhalle, on its garden, there is a nice sculpture that takes inspiration from a famous painting representing Ludwig van Beethoven himself.

What is gum-paste now?
It goes also by the name of candy clay or pastillage and it is a mixture containing confectioners’ sugar, egg whites and a hard drying edible gum (tragacanth, Tylose, CMC etc). There are many recipes around the web to realize gum-paste; some contain also glucose syrup, cornstarch, shortening or an acid component as tartaric acid or lemon juice (to keep it white I suppose).
To make it, it is not a difficult process; only a bit long and risky if you do not have experience with this kind of dough so I decided to buy mine online. That was another variable on the timeline: the delivery of all the goodies (I had also bought terracotta and black powdered food colorings and some fondant). I placed my order on Monday night and I was hoping for a maximum of 3days for the parcel to arrive. The next day though, I found an email in my mailbox detailing the order and the shipment specifications and noticed with my great surprise that the seller employed a fast delivery service (like UPS) for their parcels and not normal postal services.
On Wednesday early afternoon I had everything I needed.
The materials were there and the project was almost ready, I still had to set the scale of the centerpiece.

All the rest fell smoothly into place, until I had the brilliant idea to check for the expected drying time of gum-paste. I freaked out!
There were reports of drying time of days till at least 1 week and I had only a weekend at my disposal! Whatever, I started to work on it relying on the abnormally dry atmosphere I have been having lately in my flat (not that it hasn’t rained, the contrary but my flat remained as dry as beef-jerky).
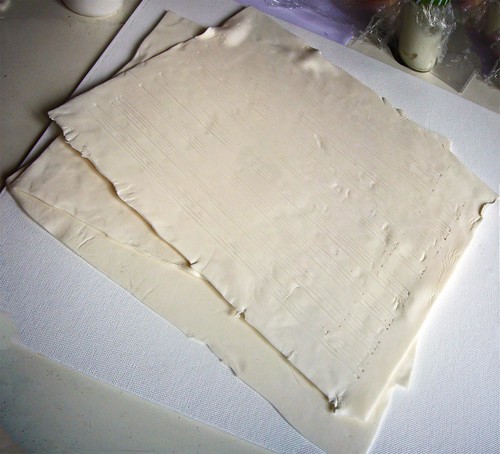
The longest (and most boring) part was to roll out the paste to make the music sheets. Have I ever mentioned how I despise rolling dough? I can never manage to obtain a uniform thickness and I am often scared of tear the dough apart so I often just push in the pastry dough for quiche shell; disgraceful right? This time though it had to be good old rolling.
The design previewed four music sheets of a 32x25cm size (as from an email received from the Beethoven’s House museum staff). Rolling pin to me!
After all it wasn’t so hard; I could also use my hands to gently stretch the dough too. Be careful when you do such a move it is really useful to get thin sheets of gum-paste but the tension you apply to the paste is quite uneven so it may tear; nothing that a bit of water and warmth can’t repair.
Warp, tear, and stretch a little bit the borders and two of the sheets were soon done.
The other two had to feature musical staffs on them, you know those sets of 5 parallel horizontal lines that give the recognition framework for musical notes? Those! Twelve set of staffs parallel to the long side of the sheets for a total of 60 lines.
How the xxxx was I going to engrave so many features in the short time I had at my disposal?
Right, I forgot to mention that gum-paste dries pretty quickly so you have a short amount of time to work it to your pleasure (the thinner the sheet the shorter the time at your disposal naturally). The more you read on the web or books about this material, the more you get freaked out. “Work fast, fast or it will dry!” that’s the motto… Why was I scared of drying time then? The fact is that only the surface of your gum-paste item will dry so you will not be able to mold it or engrave it without cracking it. You can always moisten it a bit, but it will get little sticky so you will have to dust it with more cornstarch (that’s also why I bought for the first time in my life lady stockings).
Bottom line, prepare your sheet of gum-paste, cut it, model it, engrave it fast or the surface will dry under your hands.
As concerning the cutting; I found that for long linear cuts, a chef’s knife is better than a cutter since you can’t really drag the cutter through the intended profile because of the paste’s elasticity (aka distorted cuts) while with the knife you can simply follow the blade curvature from its tip to its bottom to create a long smooth cut.
Back to the music staffs, how did I manage to engrave them? I started to fiddle with skewers and dental floss to make something that will help me engraving one whole staff at once. One length of thread was set into place; clenching now one skewer between your teeth while pulling the second one I tried to anchor the next portion of the thread in place. The third one started to give me more troubles. Was it too close to the previous one? Too far? Was it long enough? By the fourth one I had a messy bundle in my hand that I didn’t know how to disentangle. After trying for 15minutes to sort the Rubik’s threads out, I gave up out of frustration! So how did I make them?
Ta daaaaa!
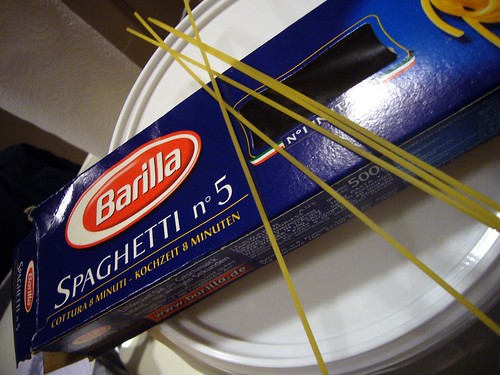
Yes you got it right, spaghetti. I do not eat much this type of pasta but my family loves it, so I always have some leftovers in my pantry. The uncooked spaghetti strings worked like a charm (though they were a little shorter than the sheet and somehow warped). I managed to fit only eleven staffs in the sheet; another thing to perfection for the next sculpture.
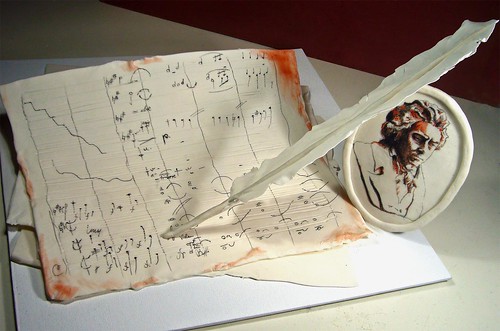
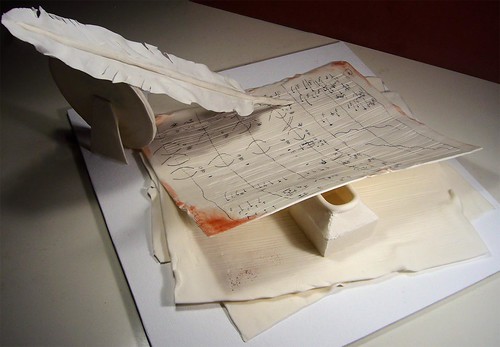
As you might have noticed from the 3D model, the uppermost sheet was supposed to be warped by gravity over the ink bottle; how do you make this with a flexible, stretchable sheet? You will need a support and since it is supposed to represent a paper sheet, what better support than real hard paper itself for the actual gum-paste sheet?

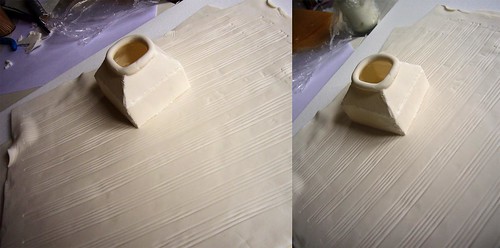
Now I just had to cut the various faces of the ink bottle and of the photo-frame.

Of the whole, I totally loved doing the quill. The light feathery weight of the sheet used for the actual plume was lovely. The stem was modeled around some metal threads that I twisted together. To cover them with gum-paste I simply modeled a snake of gum-paste and pushed the metal threads into it. To secure it into place, I melted some gum-paste in a little water to create a thick glue; I then brushed the metal threads with some of this glue, closed the snake over it and model it furthermore to seal the two borders, taper both ends and to thin its walls.
The light feathery part was made by rolling the gum-paste paper thin, roughly shaped and then glued to the stem with some more gum-paste glue. It feels more secure when I can maintain this kind of coherence in the materials used. The quill was now glued, frilled, shaped and drying on a soft cotton wool pillow. Next thing to do was to put together the ink bottle.
Why, oh why do I always forget to take into account the thickness of the elements when I cut pieces that will have to be joined together?? Oh well, I used royal icing to glue them. This is the kind of icing often used to make hard drying piped decoration on cakes and it is also often used as glue since it hardens quite strong (it consists of sugar and egg white). The problem here was that the icing is really sparkling white, while the gum-paste has a lovely light ivory color so it sort of stands out. I wasn’t really satisfied with the look of the ink bottle I must say; thankfully it was to be hidden under the music sheet. I have had the time to wait for a proper drying; I would have used some sand paper on the smudges of royal icing.
Now the hard and pivoting part of the project: Beethoven’s portrait.
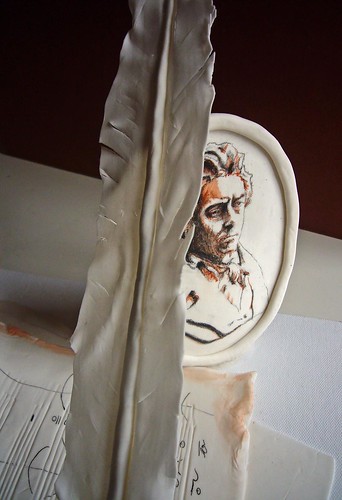
Looking on the net, the picture that I liked most was of Beethoven’s bust by Hugo Hagen so I edited it to meet my artistic style and started scratching my head trying to find a proper way to transfer the design on the half-dried oval plaque.

After having fixed a print of the portrait to the gum-paste plaque with some tape, I used a pin to pierce the contours of the essential areas and leave a trace on the plaque. The contour was then traced with a pencil before I started painting it using the powdered food colorings I had bought, diluted with some vodka.
Why use vodka and not water to dilute edible color powders?
Because alcohol dries up very fast without leaving any trace so without compromising the gum-paste surface. I could have also directly used the dry dust but this was more risky because the dry dust tends to be quite strong. When you have to color extensive areas like petals, dry is better since you can use a broader brush and discharge the excess dust more effectively (I used up to a triple zero brush). I used the dry powders only to highlight certain parts. Remember though that when you use dry powder colorings, you will have to steam a little the painted surface so to set the color.
I really enjoyed painting the portrait. It was really long time since I last used a brush to paint and this is what came out.
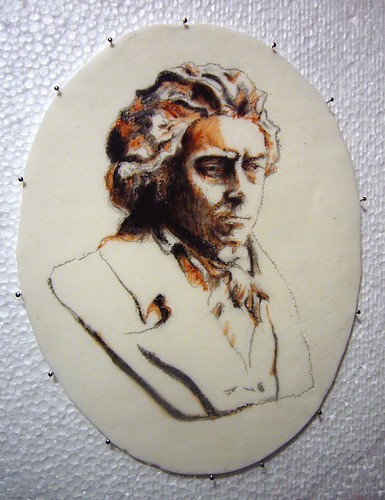
The frame was instead simply done by modeling a uniform sausage out of gum-paste and pressing it delicately around the portrait, using some gum-paste glue to melt them together. While this was drying, the second painting job was due: the music sheet.
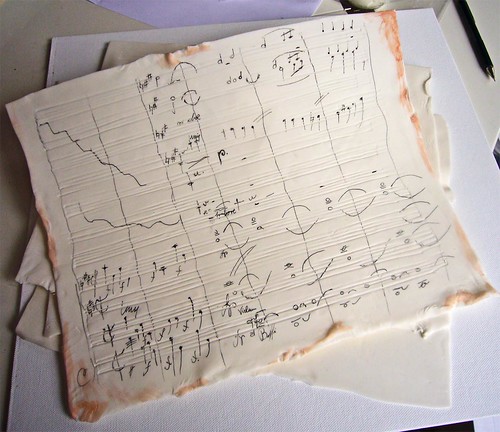
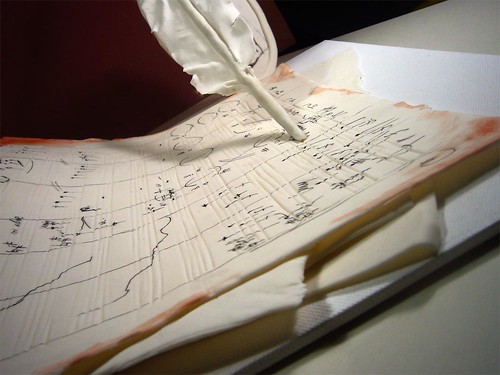
I already told you about the great resource that the Beethoven’s House museum has put on the web; among the digitized autographic documents they put on-line I found one of the few sketches for Beethoven’s 9th symphony that has reached us. We don’t have many documents regarding the composition process of this masterpiece so, even though I wanted to put something from the “Ode to Joy” segment, I had to settle for a sheet I found more appealing to the eye among the few available.

Before going to bed, I decided to put together the picture frame since it would have to be standing on the wooden board so it had to be well glued and dry. To this purpose, I used some hard glue where the back spine met the plaque and supported it with some royal icing just under the top third of the spine; I also used a support to keep it in the right position and then I let it dry over some cotton wool overnight.
The next day, Sunday, I had to finally put all the pieces together. I was scared that something could fall down or break so I used any kind of glue I had at my disposal. I checked at the picture frame and found that the royal icing had softened the spine’s gum-paste (go figure, it’s full of water…) so I decided to put it under a warm spot light to help it drying.
The assemblage started with the three lower music sheets being glued to the wooden board followed by the ink bottle.
To properly place the music sheets, I found quite useful to trace little marks along two orthogonal sides so to record the sheet orientation. To this purpose it is better to use a rather hard pencil (H or 2H) since they leave more subtle marks.
It was now time to wait; wait until the frame was sturdy enough to support the quill.
When it was put into place, it looked so pretty!! I was growing daddy’s pride.

I might have either gone elegant or lazy when I opted instead for a full set of mini-muffins topped mostly with drizzles of chocolate and nuts (this is why I ended up having 18 eggs leftover). In the specific I made a batch of dark chocolate mini-muffins with dried cherry and topped with milk chocolate and roasted hazelnuts; another batch was scented with orange zest and Chinese wine covered with a raspberry glaze and the last batch consisted of my masala muffins topped by white chocolate and roasted sesame seeds.

Doing these little precious sweet bites was very relaxing and therapeutic.
That night I finished everything quite early and started packing the muffins forgetting to take good shots at them.
The next day it was rainy; go figure… I had to wrap the centerpiece in Clingfilm like a steak before the delivery.


I loved sculpting this centerpiece; I love sculpture even though in the past I have been more involved with digital art. I guess I have now found a way to reconcile my artistic tendencies with the gastronomical world. You might see more of these centerpieces around these pages in the future.
To summarize the gum-paste tips I dispersed in this post:
- When you work with gum-paste, keep a close eye on the clock; the surface of the piece will dry quite fast. For a thickness of 3mm or so you will have roughly15 to 20 minutes to work with the paste at its best condition.
- Cornstarch will help you preventing that the gum-paste sticks to the board while rolling. Do not use too much of it though cause it dries the gum-paste surface.
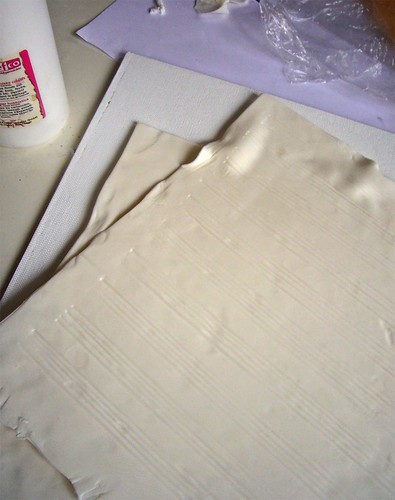
- To keep the rolled pieces from drying while you work on something else, put them inside a plastic document folder or a Ziploc bag squeezing all the air out.
- As drying is concerned, after a couple of hours thick pieces might look dry at the touch and stiff but they will still be wet inside so treat them with care.
- To handle dry pieces, wear disposable rubber gloves; the humidity of your hands will soften the paste and make it sticky.
- If you need to dry a piece faster, place it under a spot light and not in a warm oven; the sugar will melt and the gum-paste will become soft.
- If the gum-paste tears, simply pinch it back together and if this doesn’t work then slightly wet the part before pinching furthermore and dusting it with cornstarch.
- To perform long linear cut, use a chef’s knife pressing it down following the blade’s curvature line. If you would drag it through, the cut will be distorted by the elasticity of the dough.
- To glue pieces of gum-paste together simply dissolve some of it in a little water till you have thick glue.
- To paint your gum-paste it is better to dilute the food colorings with flavorless alcohol like vodka. If you use them in the dry state, remember to steam the painted surface after you have finished, fixing this way the colors.
- If you have to build a solid structure (pyramid, box etc) do not forget to take into account the thickness of the dough in the measures of the single parts. To glue the pieces together use some royal icing (confectioners’ sugar whipped into a little egg white until you get a thick paste).
Wow WOW e ancora WOW! Davvero STUPENDO!
ReplyDelete@Paula - bell'alimento Grazie mille Paula :-)) Mi fa piacere che ti sia piaciuto :)
ReplyDeletewow its amazing your so so talented they asked the right guy
ReplyDeletemasterpiece!
ReplyDeleteThat feather is breathtaking.
ReplyDeleteWOW! It's a masterpiece all right! Incredible work!! I'm impressed!
ReplyDeleteAl!! I am speechless!! This is beautiful work!! OMG!
ReplyDeleteHey--I can see why you would be tired after this epic adventure. Well done on your perseverance, it certainly paid off. Did you get to listen to any music?
ReplyDeleteCan I also ask a technology question: what technique do you use to make the photo collages in your posts? I have iPhoto on my Mac and have been doing Books and then taking screen shots. Perhaps there is a better way? Thanks for your thoughts.
wow! I'm so impressed by your work. Jaw dropping. Are you sure u don't want to switched to baking and cooking instead?
ReplyDelete@sarah For the collages I usually use programs like Photoshop or Gimp that works with layers, it is easier to position your different images, resize and edit them.
ReplyDeleteAl, I'm floored by your creativity. Its gorgeous from conception to creation. I remember you're telling me how this wasn't working the way you wanted, but I can't think why you thought so!
ReplyDeleteWas telling my daughter you're doing your PhD and she was asking why you wanted to do that, when you can do this. :D
WHOA! This is incredible. Truly. I'm just completely speechless.
ReplyDeleteOh my WORD!! I'm totally speechless. I saw your cryptic comments on Twitter and HAD to come and take a look. You completely ROCK (and I desperately want one of those mini-muffins!)
ReplyDeleteFantastic - I would love to see it in real life! You must have so much patience, well done!
ReplyDeleteWOW!!! Alessio, you did an absolutely fantastic job!! :-) I can imagine you were absolutely exhausted by the end of all this creating and cooking. I'm so glad your friends were impressed! :-)
ReplyDeleteOh my goodness - you are seriously talented, this is so intricate! I bet they loved it.
ReplyDeleteWhat a wonderful read...and what an amazing amount of work. My birthday is in December, better get to work now my friend!
ReplyDeleteJUST WOW!!! Love how you created this!!
ReplyDelete